Here is all you need to know about drying plums in the oven.
Drying plums is a great way to preserve their flavor and nutritional value. It’s also a convenient way to have this healthy fruit on hand, especially in the winter months. In this article, we will describe the process of drying plums in the oven.
We’ll give you tips on selecting the right fruit, preparing it for drying, and cooking it to perfection. Plus, we’ll tell you how to store your dried plums so that they stay fresh for months!
How to dry plums in the oven – a quick summary
- select fruit that isn’t overly ripe or bruised
- rinse your plums with cold water and remove any stems or leaves
- cut the plums in half and remove all of their pits
- preheating your oven to 175–200 degrees Fahrenheit or the lowest possible setting
- place the plums directly onto the oven rack
- dry in the oven for anywhere between 2 – 6 hours, check hourly.
Drying Plums in the Oven – Step-by-Step Guide
How to Select Plums for Drying in the Oven
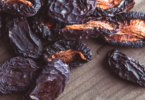
When it comes to drying plums in the oven, it’s important to select fruit that isn’t overly ripe or bruised. Plums that are too ripe will disintegrate during the drying process, while those that are too firm will never reach the desired level of sweetness.
Bruised plums, on the other hand, will develop off-flavors during drying. The perfect plum for oven-drying is one that is just beginning to soften and is free of blemishes. So next time you’re looking to dry some plums, be sure to choose wisely!
How to Prepare Plums for Drying
Before you can enjoy the sweet, delicious taste of oven-dried plums, you must first properly prepare them. This is not a difficult task, but if it is not done correctly, you may end up with a disappointing final product.
Start by thoroughly rinsing your plums with cold water. You don’t want to use hot water, as this will start the cooking process too soon and throw off the flavor and texture of the final product. You should also remove any stems or leaves from the plums at this stage, as they will be more difficult to remove once the fruit is dried.
Next, cut the plums in half and remove all of their pits. You can discard the pits or save them to be planted in your yard or garden later on.
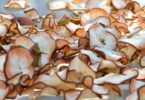
Once you have cut your plums in half, you have a decision to make. You can leave them in halves or slice them into quarters or thinner pieces. The smaller the pieces, the less time it will take to dry them in the oven. The important thing to remember is that your plums should be cut into uniformly-sized pieces. Having pieces of different sizes will result in varying drying times. Therefore, make sure that they are uniform in size so that all of your plums are finished at the same time.
You have the option of tossing your plums in an acidic juice, such as lemon, orange, or pineapple, to prevent them from becoming overly brown during the drying process. The juice will also infuse some added brightness of flavor to the final product. Some additional seasonings you can use include a pinch of salt and black pepper to taste, olive oil and balsamic vinegar (a tablespoon of each per four pounds of plums), and fresh sprigs of thyme.
How to Dry Plums in the Oven
Now that you’ve selected the perfect plums and properly prepared them, it’s time to dry them in the oven!
- Start by preheating your oven to 175–200 degrees Fahrenheit or the lowest possible setting on your oven.
- Next, arrange your plum halves or slices on the oven rack (Make sure to take your oven rack out before preheating so you don’t burn yourself!). It’s best to dry plums directly onto the oven rack because they release lots of juices during the cooking process, and you want that juice to drip onto a tray below. Plums left sitting in their own juices while cooking will significantly extend the drying process.
- Allow the plums to dry in the oven for anywhere between two to six hours, depending on how dry you want them. Make sure to check them at least every hour, and flip them periodically so they dry evenly.
Once your plums have dried to your personal preference, remove them from the oven and allow them to cool.
How to Store Oven-Dried Plums
Storing your plums is easy to do, and their shelf-life will depend on how juicy or dry your final product is. The drier the plums, the longer they will last. Store them in jars or freezer bags in your refrigerator (or freezer), and they will last anywhere from six months to a year!
SEE ALSO: 3 Simple Methods of Drying Plums at Home
The Benefits of Drying Plums in the Oven
Drying plums in the oven may not sound like the most exciting way to spend an afternoon, but there are actually quite a few benefits of this method of preservation. For one, it helps to concentrate the flavors of the fruit, resulting in a sweeter and more intensely flavored dried plum.
Additionally, oven-drying helps to preserve the nutrient content of the fruit, making it a healthier option than other methods of drying. Finally, oven-dried plums tend to retain their shape better than those that are air-dried, making them perfect for use in recipes or as a snack on their own. So if you’re looking for a delicious and healthy way to preserve your summer bounty, consider giving oven-drying a try.
Conclusion
Drying plums in the oven is a fun and easy way to enjoy this delicious fruit all year long! Be sure to choose ripe, unblemished plums for the best results. Follow the steps outlined in this article for perfect oven-dried plums every time!
Photo by Joanna Derks on Unsplash