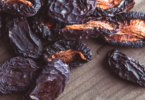
Welcome to “The Ultimate Guide to Drying Apples: Preserve the Harvest.” If you’re a food enthusiast like me, you know that apples are a quintessential fruit of the fall season. Whether you’ve picked them fresh from an orchard or found a great deal at your local market, you may have wondered how to make that apple goodness last throughout the year. That’s where drying apples come in!
In this comprehensive guide, I’ll be sharing tips and techniques based on my personal experiences with drying apples. Over the years, I’ve experimented with various methods, learned from my successes and mishaps, and uncovered the secrets to achieving perfectly dried apples that retain their flavor and texture. Dried apples are not only a fantastic snack on their own but also a versatile ingredient in a wide range of recipes, from trail mix to pies and everything in between.
Read also about the health benefits of dried apples.
So, join me on this culinary adventure as we explore the art of drying apples. Whether you’re a seasoned home cook or a novice in the kitchen, this guide is designed to help you master the art of preserving apples, ensuring you have a delightful supply of this wholesome snack whenever cravings strike or culinary inspiration calls.
Let’s get started!
How to dry apples with a dehydrator.
How to Dry Apples
Choosing the Right Apples
Selecting the right apples is the first step in creating delicious and perfectly dried apple snacks. Different apple varieties have distinct flavors, textures, and sugar content, which can significantly impact the final product. Here are some key considerations for choosing the best apples for drying:
- Variety Matters: While nearly any apple can be dried, certain varieties are better suited for this purpose. Varieties like Granny Smith, Fuji, Honeycrisp, and Gala are popular choices due to their sweet-tart flavor and firm texture. Experiment with different varieties to find your personal favorite.
- Flavor Profile: Consider the flavor you want in your dried apples. Sweeter apples like Fuji and Gala will yield sweeter dried apples, while tart varieties like Granny Smith will result in a more tangy flavor. Combining different apple types can also create unique flavor profiles.
- Texture: Texture is crucial when drying apples. You’ll want apples that are crisp and firm, as mushy apples won’t dehydrate well. Look for apples that are free from bruises or soft spots, as these imperfections can affect the drying process.
- Sugar Content: Apples with higher sugar content will naturally be sweeter when dried. Keep in mind that some apples may require less added sweetener, making them a healthier option for those watching their sugar intake.
- Local and Seasonal: Whenever possible, choose apples that are in season and locally sourced. Not only will you support local farmers, but you’ll also enjoy apples at their peak flavor and freshness.
- Combining Varieties: Don’t be afraid to mix and match apple varieties. Combining sweet and tart apples can create a balanced flavor profile in your dried apple snacks.
Remember that personal taste plays a significant role in choosing apples for drying. Experiment with different varieties to find the ones that best suit your preferences and the recipes you plan to use them in. In the next section, we’ll dive into the essential equipment and supplies you’ll need to get started with the drying process.
Equipment and Supplies
Before you embark on your journey to drying apples, it’s essential to gather the right equipment and supplies. Proper preparation and the right tools will make the drying process efficient and successful.
Here’s a list of the essential items you’ll need:
- Apples: Start with a batch of fresh, high-quality apples. Refer to Section 1 for tips on choosing the right apple varieties.
- Knife or Apple Slicer/Corer: You’ll need a sharp knife or an apple slicer/corer to prepare the apples for drying. An apple slicer/corer is a handy tool that makes the process quicker and more uniform.
- Cutting Board: Use a clean and sturdy cutting board to slice and prep the apples safely.
- Lemon Juice (Optional): Lemon juice can be used to prevent browning of apple slices. It adds a touch of acidity that helps maintain the apple’s natural color. If you choose to use lemon juice, have a fresh lemon on hand.
- Dehydrator: A food dehydrator is a specialized appliance designed for drying fruits and other foods. It provides even airflow and temperature control, making it an excellent choice for consistent results.
- Oven (Alternative): If you don’t have a dehydrator, you can use your oven. Make sure your oven can be set to a low temperature (around 140°F to 160°F or 60°C to 70°C).
- Baking Sheets: If you’re using an oven, you’ll need baking sheets to place the apple slices on. Line them with parchment paper or a silicone baking mat for easy removal.
- Cooling Racks (Optional): Cooling racks can be used to allow air circulation around the apple slices when using the oven. This helps with even drying.
- Storage Containers: You’ll need airtight containers or resealable bags to store your dried apples once they’re ready. Mason jars or vacuum-sealed bags are excellent options for long-term storage.
- Timer: A timer, whether built into your dehydrator or a separate kitchen timer, will help you keep track of drying times.
- Labels and Marker: If you plan to store different apple varieties or batches, labels and a marker will help you identify and date your dried apples.
- Clean Towels and Kitchen Paper: Keep some clean towels and kitchen paper nearby for patting apple slices dry and wiping down surfaces.
Now that you have your equipment and supplies ready, you’re well-prepared to start the apple drying process. In the next section, we’ll guide you through the essential steps of preparing apples for drying and preventing browning, ensuring your dried apples turn out beautifully.
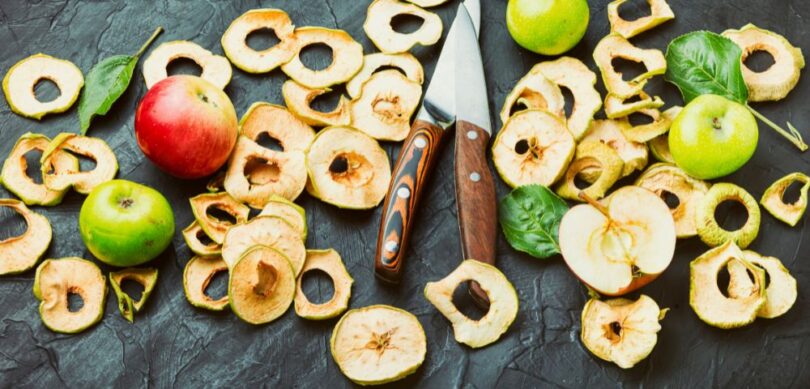
Preparing Apples for Drying
Properly preparing your apples is a crucial step in the drying process. This step ensures that your dried apples will be consistent in texture and flavor. Here’s a step-by-step guide on how to prepare your apples for drying:
1. Wash the Apples
Start by thoroughly washing the apples under cold running water. Use a vegetable brush to scrub away any dirt or residue. This step helps remove any surface contaminants.
2. Peel or Leave the Skin (Optional)
Whether or not you peel the apples is a matter of personal preference and recipe requirements. Apple peels contain nutrients and fiber, but some people prefer the texture and appearance of peeled apples. If you choose to peel them, use a sharp vegetable peeler or a paring knife.
3. Core the Apples
Use an apple corer tool or a knife to remove the cores from the apples. Make sure to remove all the seeds and the hard central core.
4. Slice or Cut into Rings
Decide whether you want to slice your apples into rings or thin strips. You can use a knife for this, but for a quicker and more uniform result, an apple slicer/corer is a handy tool. Aim for slices that are about 1/4 to 1/8 inch thick (0.6 to 0.3 cm) for even drying.
5. Optional Lemon Juice Bath
To prevent browning, you can immerse the apple slices in a mixture of water and lemon juice. The acid in the lemon juice helps maintain the apple’s natural color. Use about 1 tablespoon of lemon juice per cup of water. This step is optional, but it’s especially helpful when using varieties prone to browning, such as Granny Smith.
6. Pat Dry
After slicing, pat the apple slices dry with a clean kitchen towel or paper towel. This step removes excess moisture, which can extend the drying time.
With your apples properly prepared, you’re now ready to move on to the next steps, where we’ll explore various methods for preventing browning and then delve into the actual drying process. Whether you choose to use a dehydrator or an oven, the key to successfully dried apples lies in the details of the process, which we’ll cover in upcoming sections.
Preventing Browning
One common challenge when drying apples is preventing them from turning brown during the preparation process. Browning occurs due to enzymatic oxidation, which can affect the appearance and taste of your dried apples. Fortunately, there are several effective methods to prevent browning and keep your apples looking and tasting fresh. Here are some options to consider:
1. Lemon Juice Solution
As mentioned in the previous section, immersing your apple slices in a mixture of water and lemon juice is a widely used method to prevent browning. Lemon juice contains citric acid, which inhibits enzymatic browning.
Use approximately 1 tablespoon of lemon juice per cup of water. Soak the apple slices in this solution for 3-5 minutes before drying. Make sure to drain them thoroughly before proceeding.
2. Commercial Anti-Browning Products
There are commercial products available, often referred to as “fruit fresheners” or “fruit retainers,” designed specifically to prevent browning in fruits like apples. Follow the manufacturer’s instructions for usage.
3. Ascorbic Acid (Vitamin C)
Crushed vitamin C tablets or ascorbic acid powder can also be used to create an anti-browning solution. Dissolve 1 teaspoon of ascorbic acid in a cup of water and soak the apple slices for a few minutes.
Ascorbic acid is a natural antioxidant and is effective in preventing browning.
4. Honey Solution (Optional)
Some people prefer using a honey and water solution to prevent browning. Mix 1 tablespoon of honey with a cup of warm water and soak the apple slices for a few minutes.
Keep in mind that this method may add sweetness to your apples, which can be desirable in some recipes.
5. Saltwater Solution (Alternative)
Another option is to soak apple slices briefly in a saltwater solution. Mix 1/2 teaspoon of salt in a cup of water. This method may not prevent browning as effectively as lemon juice or ascorbic acid but can be used as an alternative.
6. Vacuum Sealing (Advanced)
If you have access to a vacuum sealer, you can vacuum seal the apple slices to remove oxygen, which helps prevent oxidation and browning. This is a more advanced method.
Remember that while these methods are effective in preventing browning, they may introduce some additional flavors or sweetness to your apples, so choose the one that best suits your taste preferences and intended recipes. Once you’ve successfully prevented browning, you’re ready to move on to the drying phase, which we’ll cover in the upcoming sections.
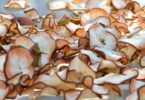
Drying Methods
Now that you’ve selected the right apples and prepared them for drying while preventing browning, it’s time to explore the various methods available for drying apples. Each method has its own advantages and can yield delicious results. Below, we’ll discuss three common drying methods: using a dehydrator, using an oven, and air-drying.
How to Dry Apples With a Dehydrator
A food dehydrator is a specialized appliance designed for drying fruits, vegetables, and other foods. It offers precise temperature control and consistent airflow, making it an excellent choice for drying apples. Here’s how to use a dehydrator:
- Prepare the Dehydrator: Read your dehydrator’s instruction manual to understand its settings and trays. Assemble the trays and make sure they are clean and dry.
- Arrange the Apple Slices: Place the apple slices on the trays in a single layer, ensuring they don’t overlap. Leave some space for air circulation.
- Set the Temperature: Different dehydrators have varying temperature settings. Typically, for apples, you’ll want to set the temperature to around 135°F to 140°F (57°C to 60°C).
- Drying Time: The drying time can vary based on apple thickness, humidity, and the dehydrator model. It usually takes between 6 to 12 hours. Check the manufacturer’s guidelines for recommended drying times.
- Rotate Trays: Periodically, rotate the trays to ensure even drying. Some dehydrators have fans that eliminate the need for tray rotation.
- Check for Doneness: To determine if the apples are done, remove a slice and let it cool for a few minutes. It should be pliable and not sticky when bent. If it’s still sticky or moist, continue drying.
Additional tips for Dehydrating Apples with a Dehydrator
If you’ve chosen to use a food dehydrator for drying your apples, you’re on the path to producing delicious and perfectly preserved apple snacks. To ensure the best results, consider the following tips and guidelines for using a dehydrator effectively:
Read the Instruction Manual
Familiarize yourself with your specific dehydrator model by reading the instruction manual. Each dehydrator may have unique features, settings, and guidelines.
Preheat the Dehydrator
It’s a good practice to preheat your dehydrator for about 15-30 minutes before loading the trays. This helps establish a stable drying environment from the start.
Arrange Slices Evenly
Lay the apple slices on the dehydrator trays in a single layer, ensuring they do not overlap. Proper spacing allows for adequate airflow, promoting even drying.
Consider Using Non-Stick Sheets or Parchment Paper
To prevent sticking, you can use non-stick sheets designed for your dehydrator or parchment paper cut to fit the trays. This makes it easier to remove dried apple slices later.
Maintain Consistent Thickness
Try to cut your apple slices to a consistent thickness. This will ensure that they dry at a similar rate, resulting in uniform texture and doneness.
Monitor the Temperature
Keep an eye on the temperature setting throughout the drying process. Apples are typically dried at a temperature of around 135°F to 140°F (57°C to 60°C). Temperature control is critical to achieve the desired texture without over-drying.
Rotate the Trays
Depending on your dehydrator’s design, you may need to rotate the trays periodically to ensure even drying. Some dehydrators have fans that distribute heat evenly, reducing the need for tray rotation.
Check for Doneness
As the drying time progresses, periodically check a sample apple slice for doneness. It should be pliable and leathery but not sticky or overly dry.
Dry Similar Varieties Together
If you’re drying different apple varieties or batches, it’s a good practice to group similar ones together. Different varieties may have slightly different drying times.
Cool Before Storage
Allow the dried apple slices to cool completely before storing them. This prevents moisture buildup in the storage container.
Store Properly
Store your dried apple slices in airtight containers or resealable bags in a cool, dark place. Removing as much air as possible helps prolong their shelf life.
Label and Date
Don’t forget to label your storage containers with the date of drying and the apple variety, especially if you’re drying different types.
By following these dehydrating tips, you’ll have a batch of perfectly dried apples that are not only delicious on their own but also ideal for adding a burst of natural sweetness and flavor to your favorite recipes. Whether you’re making homemade granola, trail mix, or apple cinnamon muffins, your dried apples will be a valuable ingredient in your culinary adventures. In the next section, we’ll explore tips for those using the oven as their drying method.
How to Dry Apples in an Oven
If you don’t have a dehydrator, you can use your oven to dry apples.
Here’s how:
- Preheat the Oven: Preheat your oven to its lowest setting, usually around 140°F to 160°F (60°C to 70°C). Use an oven thermometer to ensure accuracy.
- Prepare Baking Sheets: Line baking sheets with parchment paper or silicone mats to prevent sticking.
- Arrange the Apple Slices: Place the apple slices on the prepared baking sheets in a single layer, making sure they do not overlap.
- Drying Time: Drying apples in the oven typically takes longer than with a dehydrator, approximately 6 to 12 hours. Keep an eye on them and rotate the sheets as needed for even drying.
- Check for Doneness: Follow the same doneness test mentioned earlier for dehydrators. Apples should be pliable but not sticky.
Additional Tips for Drying Apples in the Oven
If you’ve opted to dry your apples using an oven, you can still achieve fantastic results with a few key tips and techniques. Oven drying is a viable alternative when you don’t have access to a dehydrator. Here’s how to make the most of your oven-drying experience
Preheat the Oven
Start by preheating your oven to its lowest setting, typically around 140°F to 160°F (60°C to 70°C). Ensure the accuracy of your oven’s temperature with an oven thermometer.
Use Baking Sheets and Parchment Paper
Line baking sheets with parchment paper or silicone baking mats to prevent sticking and make it easier to remove the dried apple slices later.
Space Apple Slices Evenly
Arrange the apple slices on the prepared baking sheets in a single layer. Avoid overlapping to ensure proper airflow and even drying.
Rotate Sheets for Even Drying
Rotate the baking sheets periodically during the drying process to ensure that all the apple slices dry evenly. Different areas of the oven may have variations in temperature.
Monitor Temperature
Keep an eye on the oven temperature throughout the drying process. It’s important to maintain a low and consistent temperature to achieve the desired texture without over-drying.
Use the Convection Setting (Optional)
If your oven has a convection setting, consider using it. Convection ovens have fans that circulate hot air, promoting even drying. This can help reduce drying time.
Check for Doneness
As the drying time progresses, periodically check a sample apple slice for doneness. The slices should be pliable and leathery but not sticky or excessively dry.
Patience is Key
Oven drying can take longer than using a dehydrator, typically around 6 to 12 hours or more. Be patient and allow the apples to dry thoroughly.
Cooling Before Storage
After removing the dried apple slices from the oven, let them cool completely on the baking sheets before transferring them to storage containers. This helps prevent moisture buildup in the containers.
Store Properly
Store your dried apple slices in airtight containers or resealable bags in a cool, dark place. Squeeze out as much air as possible to extend their shelf life.
Label and Date
Don’t forget to label your storage containers with the date of drying and the apple variety if you’re drying different types.
While oven drying may take a bit more time and attention compared to a food dehydrator, it can produce excellent results. Your dried apples will be a delightful addition to your pantry, ready to be enjoyed as a nutritious snack or used in various recipes. In the next section, we’ll explore the air-drying method, which is the most natural way to preserve apples.
Air-Drying Apples
Air-drying is the most natural method of drying apples. It requires the least equipment but takes the longest time. Here’s how to air-dry apples:
- Slice and Prepare: Slice the apples, and if desired, treat them with an anti-browning solution.
- Arrange on Racks: Place the apple slices on clean, food-safe racks or screens in a single layer. Ensure good air circulation around the slices.
- Choose a Drying Location: Find a suitable location for air-drying, such as a warm, dry, and well-ventilated room or an outdoor area with protection from insects and direct sunlight.
- Drying Time: Air-drying can take several days to a week, depending on the environmental conditions. Rotate the apple slices periodically to ensure even drying.
- Check for Doneness: Use the same doneness test as with other methods to ensure the slices are adequately dried.
Choose the drying method that best fits your equipment and time constraints. Regardless of the method, the goal is to remove moisture from the apples, leaving them with a chewy, leathery texture that’s perfect for snacking or using in various recipes. In the next section, we’ll delve into specific tips for each drying method to help you achieve the best results.
Additional Tips for Air-Drying Apples
Air-drying apples is the most natural and traditional method of preserving them. While it may take more time compared to using a dehydrator or oven, it offers simplicity and a connection to traditional food preservation techniques. Here are some tips to ensure successful air-drying of your apples:
Slice Apples Uniformly
For consistent drying, aim to slice your apples to a uniform thickness, typically around 1/4 to 1/8 inch (0.6 to 0.3 cm). This helps ensure that all the slices dry at a similar rate.
Use Anti-Browning Methods (Optional)
While air-drying, you may choose to use an anti-browning method such as soaking the apple slices in a lemon juice solution or other solutions mentioned in Section 4. This can help maintain the apple’s natural color.
Choose the Right Location
Find a suitable location for air-drying, such as a warm, dry, and well-ventilated room or an outdoor area with protection from insects and direct sunlight.
Arrange Slices for Airflow
Lay the apple slices on clean, food-safe racks or screens in a single layer. Ensure that there’s good air circulation around the slices. You can also use clean cheesecloth or kitchen towels to lay the slices.
Patience is Essential
Air-drying is the slowest method and can take several days to a week or more, depending on environmental conditions. Be patient and allow the apples to dry thoroughly.
Rotate and Flip Slices
To ensure even drying, periodically rotate the apple slices and, if using racks or screens, flip them. This helps all sides of the slices dry uniformly.
Check for Doneness
To determine if the apples are done, remove a sample slice and let it cool for a few minutes. It should be pliable and leathery but not sticky or overly dry.
Protect from Dust and Insects
If air-drying outdoors, cover the apple slices with a clean, breathable cloth or mesh to protect them from dust, insects, and debris.
Maintain a Consistent Environment
Keep the drying area at a consistent temperature and humidity level, if possible. Avoid exposing the apples to direct sunlight, which can cause uneven drying and potential overheating.
Store Properly
Once the apple slices are adequately dried, store them in airtight containers or resealable bags in a cool, dark place. Removing as much air as possible helps prolong their shelf life.
Label and Date
Don’t forget to label your storage containers with the date of drying and the apple variety if you’re drying different types.
Air-drying apples may take more time, but it’s a rewarding and sustainable method that allows you to preserve the natural flavor and sweetness of the fruit. Once you’ve mastered air-drying, you’ll have a stash of homemade dried apples ready to enjoy as a wholesome snack or as an ingredient in your favorite recipes. In the next section, we’ll discuss the proper storage of your dried apples to ensure their long-term freshness.
Storing Dried Apples
Proper storage is crucial to maintain the quality, flavor, and shelf life of your dried apples. Whether you’ve used a dehydrator, oven, or air-drying method, follow these storage guidelines to keep your dried apples fresh for an extended period.
Cool Completely Before Storage
Ensure that your dried apple slices have cooled completely before placing them in storage containers. Warm or hot apples can create condensation inside the container, leading to moisture buildup and potential spoilage.
Use Airtight Containers
Choose airtight containers or resealable bags designed for food storage. These containers help keep air out, which is essential for preserving the texture and flavor of dried apples.
Remove Excess Air
Whenever possible, press out as much air as you can before sealing the containers. Reduced oxygen exposure helps prevent oxidation and maintains freshness.
Label and Date
Clearly label your storage containers with the date of drying and the apple variety if you’ve dried different types. This information helps you keep track of freshness and prevents confusion.
Store in a Cool, Dark Place
Find a cool and dark storage location, away from direct sunlight and heat sources. A pantry, cupboard, or a cool basement is ideal for long-term storage.
Temperature Control
Keep the storage area at a stable and moderate temperature. Ideally, the temperature should be between 50°F to 70°F (10°C to 21°C). Fluctuations in temperature and humidity can affect the quality of the dried apples.
Check for Moisture
Periodically inspect your stored dried apples for any signs of moisture or condensation inside the containers. If moisture is present, remove the affected slices immediately to prevent spoilage.
Keep Away from Odors
Dried apples can absorb odors from their surroundings, so store them away from strong-smelling foods or substances.
Use Oxygen Absorbers (Optional)
For long-term storage, consider using food-grade oxygen absorbers in your containers. These can help extend the shelf life by reducing oxygen levels.
Use Within a Year
While dried apples can last for several months to a year when stored properly, it’s a good practice to rotate your stock and use the oldest apples first to ensure their freshness.
Recheck Periodically
Periodically inspect your stored dried apples for any signs of spoilage, such as off-putting odors, mold, or unusual changes in texture or color. Remove any affected slices immediately to prevent contamination of the entire batch.
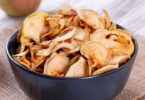
By following these storage guidelines, your dried apples should remain flavorful, nutritious, and ready to enjoy in various recipes or as a wholesome snack for an extended period. Properly stored dried apples are a convenient and delicious addition to your pantry, providing you with the taste of autumn year-round.
Drying apples is a rewarding and practical way to preserve the natural sweetness and flavor of this beloved fruit. Whether you choose to use a food dehydrator, oven, or the traditional air-drying method, the process allows you to enjoy apples year-round, even when they are out of season.
By following the steps outlined in this complete guide, you can create your own batch of dried apples with confidence. It all begins with selecting the right apple varieties and preparing them carefully to prevent browning. Equipped with the proper equipment and a clear understanding of your chosen drying method, you can embark on the journey of transforming fresh apples into delicious and nutritious snacks.
Remember to take the time to choose the right storage containers and follow the recommended storage guidelines to ensure your dried apples maintain their freshness and quality. Properly stored dried apples can be a valuable addition to your pantry, ready to enhance your recipes or satisfy your cravings for a wholesome snack.
Whether you enjoy them on their own, add them to baked goods, salads, or savory dishes, or even rehydrate them for specific culinary applications, dried apples offer versatility and a taste of the season in every bite. So, whether you’re preserving a bumper crop of apples from your own orchard or simply indulging in a tasty and nutritious treat, drying apples is a culinary adventure well worth exploring.