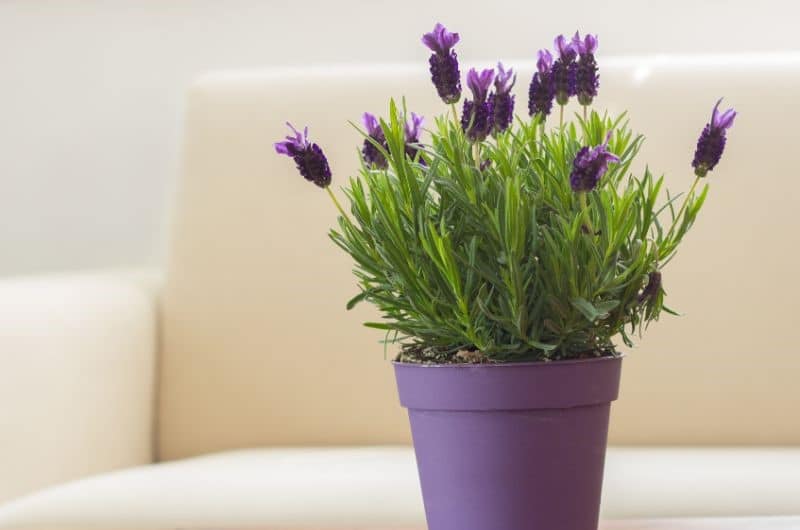
How to grow lavender indoors. Here are eight expert steps on growing lavender in the pot in your own home. Learn more and start growing lavender.
Even though lavender is native to Europe and the Mediterranean, it may be cultivated in various temperatures and growing zones. Although it is not a standard houseplant, that does not rule out the possibility of success.
In no time, you’ll have a flourishing, delicious-smelling lavender plant blooming in your house, thanks to your dedication and care. Lavender flowers, which are used to make perfume and sachets, and the aromatic gray-green leaves of these plants, are highly sought.
Growing lavender indoors involves several problems, so follow these guidelines to get the best possible results.
SEE ALSO: 5 Easy Methods of Drying Lavender at Home
How to Grow Lavender Indoors?
Step 1: Growing lavender from seed
Use a tray filled with a sandy potting mix for growing lavender from seed. We recommend using vermiculite, sand, sphagnum moss, or something else that drains effectively if you wish to make your own.
We recommend using a heat mat since it will aid with germination. Water the seeds evenly, but do not keep them wet all of the time. One of the most serious threats to lavender plants is overwatering. This might result in the seeds rotting or drowning.
Step 2: Proper placement
Lavender must be given as much light as possible when growing it indoors. It thrives in a south-facing window or somewhere with three to four hours of direct sunshine daily. Turn the pot once a week to ensure even growth and flowering. The lavender plant will generate weak, lanky growth, stop producing blooms, and become more prone to disease if not given adequate light.
Indoors, proper ventilation and air movement are essential, but the plant should not be placed where it will be subjected to forced-air heat. From spring through mid-fall, ideal indoor temperatures are 50 to 55 degrees F at night and 70 degrees F during the day. Temperatures should be lower from late fall to early winter, with lows of 45 to 50 degrees F at night and highs of 60 to 65 degrees F during the day.
After all threat of frost has passed, the lavender plant will benefit from being transferred to a semi-shaded spot outside. It may be planted outside in the spring in a sunny location. When fully developed, the plant can withstand temperatures as low as 10 degrees Fahrenheit.
Step 3: Choosing the correct pot
When growing lavender indoors, plant it in a terra cotta planter to keep it looking nice. Terra cotta, which dries quickly, contributes to creating a Mediterranean atmosphere. Use good-quality potting soil to repot after one year or in the early spring into an 8-inch container.

Every spring, repot the plant into a larger container to let it attain its maximum flowering and growing potential. The first year after your lavender has been established in its permanent place, it will likely develop slowly, but most plants will still produce flowers. Expect increased growth and larger blooms in the second and subsequent years.
Step 4: Getting the correct soil
In a well-draining, rocky soil, lavender grows to its fullest potential. Consider adding limestone to your conventional potting soil as a supplement.
Fill your container halfway with a sterile potting mix, or make your own from scratch. You can make your potting soil mix by combining around 60 percent peat moss with 40 percent perlite and a couple of handfuls of our handmade compost.
Step 5: Watering your lavender plants
When watering, always saturate the soil and let it become somewhat dry between waterings. You may determine its moisture content by pressing your finger into the earth. Over-watering and allowing the soil to remain continually moist are also risk factors for rot.
However, do not allow the soil to become entirely dry since this can cause the lavender to react by yellowing the bottom foliage. If you decide to bring your lavender outside in the spring, keep in mind that it may dry out more rapidly and require more frequent waterings.
Water should be applied directly to the soil. Never try to water directly over the plant. Splashing water on the plant’s foliage might result in mold and bug infestations on the plant’s leaves.
Step 6: Fertilizing
During the spring and summer, fertilize with a half-strength all-purpose, water-soluble fertilizer every four weeks at half strength. Alkaline should be added to your soil. Once a month, crush up eggshells and mix them into your garden’s top layer of soil. You might also experiment with a tiny bit of lime juice in the mixture.
Step 7: Pruning your lavender plants
Branches are cut for flower harvesting, which encourages new growth and encourages bushiness in the plant. If you want your plants bushier, make sure to trim them now and again. Keep in mind that blooms are formed at the tips of the branches and that frequent tip cutting will restrict flowering.
SEE ALSO: An Expert Guide to Harvesting Lavender
Step 8: Don’t forget to do your research
Remember to conduct thorough research. Some lavender types, like “Lady” and “Munstead,” are more suited for culinary application than others. The more fragrant and delicious the lavender, the better it will taste.
When growing lavender indoors, you might want to try your hand with a smaller variety. Although there are various options to select from—we recommend trying French lavender first.
Here is a great video on how to grow lavender indoors in a pot.
SEE ALSO: Beginner Friendly Tips and Tricks for Drying Lavender Leaves at Home


[…] How to Grow Lavender Indoors – 8 Expert Tips […]
[…] How to Grow Lavender Indoors – 8 Expert Tips […]